HOW TO GIVE YOUR MARKETER ACCESS TO YOUR FACEBOOK AND INSTAGRAM
Hiring a digital marketer is exciting. Figuring out how to give them access without accidentally handing over your entire account? Less exciting. We have put this guide together to make it as simple as possible so you can get your marketer set up quickly and correctly without the confusion.
There are two ways to do this depending on where you are in your business.
WHICH METHOD IS RIGHT FOR YOU?
Option 1 — The Basic Method Best if you just have a Facebook Page and need your marketer to manage posts, run basic ads, and reply to messages. Quick setup, minimal tech required.
Option 2 — The Professional Method Best if you are running real ad campaigns, tracking website conversions, or scaling your advertising. This is the right setup for anyone working with a professional digital marketing agency.
Not sure which one you need? If you are working with Digital Savvy, we will always recommend Option 2. It protects your assets, keeps your data secure, and gives us everything we need to get you real results.
Option 1: THE BASIC METHOD (Page-Level Access)
Use this if you do not use Meta Business Suite and only need your marketer to run boosted posts, manage standard page ads, and reply to messages.
Step 1: Link Your Instagram to Your Facebook Page
Before you invite anyone, make sure your Instagram is connected to your Facebook Page. This is the step most people skip and then wonder why their marketer cannot see their Instagram.
Log into Facebook on a computer. Click your profile picture in the top right and switch to your Business Page.
Click Settings and Privacy, then Settings.
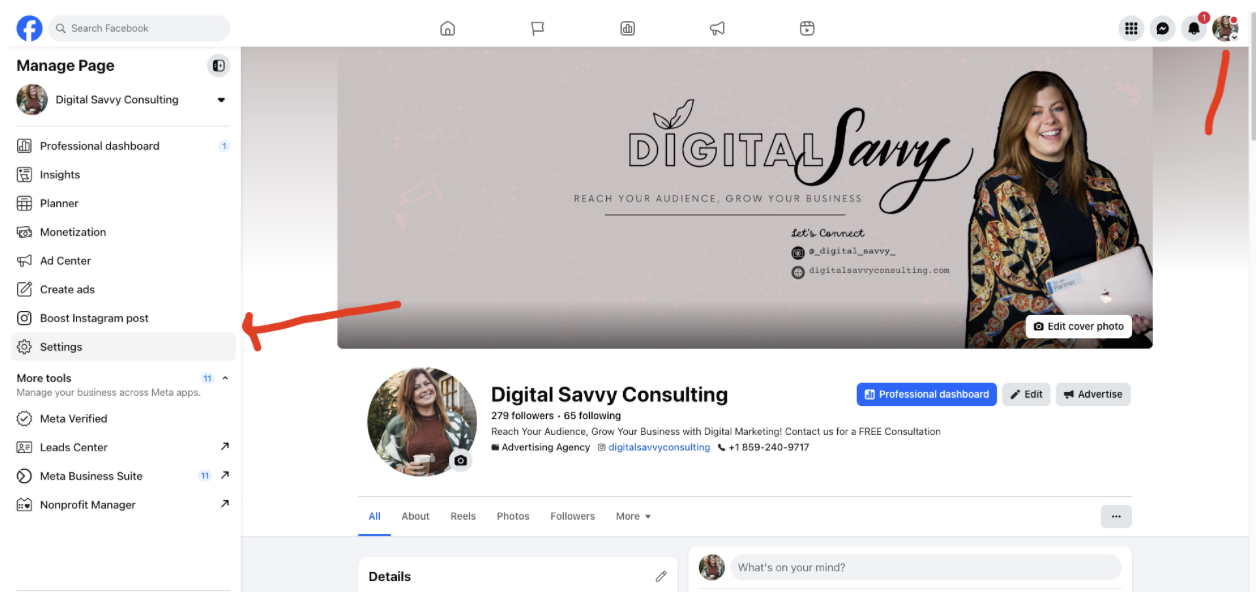
3. In the left menu, scroll down and click Linked Accounts.
4. Select Instagram, click Connect Account, and follow the prompts to log into your Instagram Business account
Step 2: Give Your Marketer Page Access
Still in your Page Settings, click Page Setup or New Pages Experience in the left sidebar.
Click Page Access.
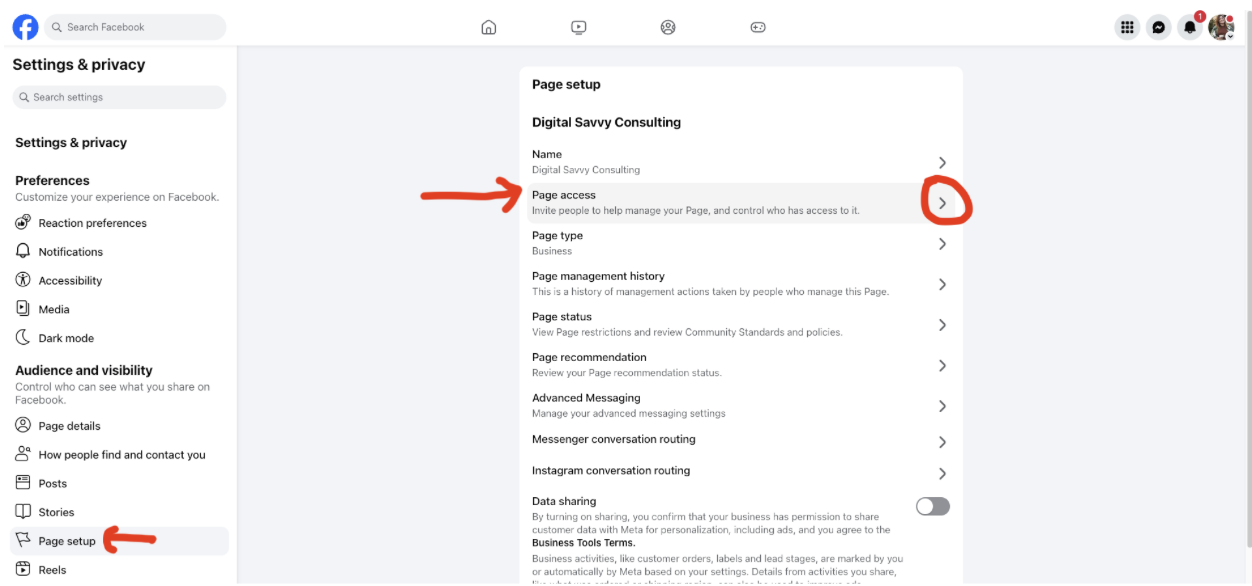
3. Next to "People with Facebook access," click Add New and hit Next.
4. Type your marketer's first & last name or email address and select them.
5. Toggle Full Control to ON so they can run ads and manage your linked Instagram.
6. Click Give Access, enter your password, and click Confirm.
One important note here. Your marketer has 28 days to accept the invite before it expires. Give them a heads up that it is coming so they do not miss it.
Option 2: THE PROFESSIONAL METHOD (Meta Business Suite)
This is the setup we recommend for anyone running serious ad campaigns. It keeps everything organized in one secure place and makes sure your marketer has access to your Page, Instagram, Ad Account, and Pixel all at once. We break it down below.. But if you want it from the horses mouth, here’s the Meta Version Step by Step!
Step 1: Connect Your Instagram in Business Settings
In the left sidebar, click Accounts and then Instagram Accounts.
Click the blue Add button, then click Connect Your Instagram Account.
Log into your Instagram Business account to complete the connection.
Step 2: Invite Your Marketer and Assign Assets
In the same Business Settings menu, look under Users on the left and click People.
Click the blue Invite People button in the top right.
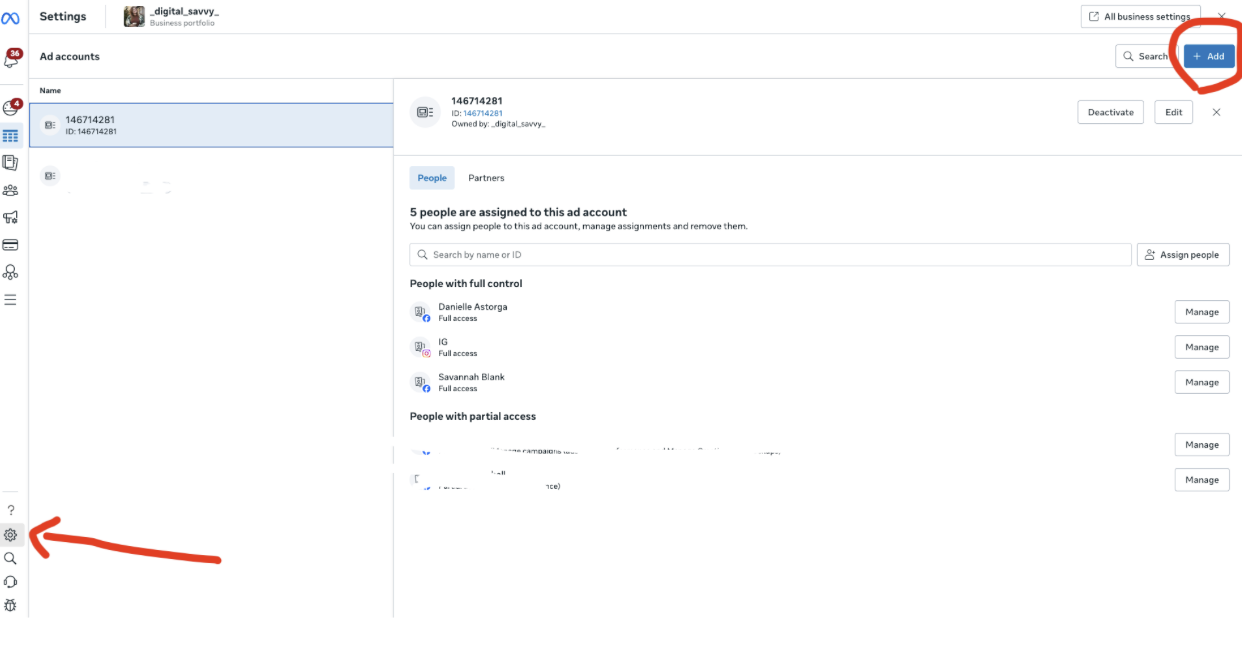
3. Enter your marketer's professional email address and click Next.
4. Under Business Portfolio Permissions, select Full Control so they can manage campaigns and view conversion data. Click Next.
5. Now assign your assets. Go through the list and check the boxes for each of the following:
Facebook Page
Instagram Account
Ad Account
Pixels and Datasets (do not skip this one — more on that below)
6. For each asset you check, make sure the toggle for Full Control or Manage is turned ON.
7. Click Invite. Your marketer will receive an email to join your business portfolio.
THREE THINGS PEOPLE ALWAYS FORGET
These are the gotchas we see constantly and they always cause delays. Read these before you think you are done.
1. You need a real personal Facebook profile.
Facebook still requires every business page to be managed by a real personal account. If you created a fake "business only" personal profile to avoid mixing your personal and professional life, Meta's security system may flag and shut it down. Use your real personal account. You are in control of what you share publicly and your personal profile does not need to be visible to anyone you do not want to see it.
2. The Pixel is not automatic.
If you want to track website visits, form submissions, purchases, or any other conversion from your ads, you need a Meta Pixel installed on your website. Sharing your Ad Account access without also sharing the Pixel means your marketer is working without the most important piece of tracking data available. In Option 2, make sure you check the box for Pixels and Datasets when assigning assets. If your pixel is not set up yet, that is something we can help with.
3. Your Instagram password still matters.
Even after you connect Instagram to your Facebook Page, some ad tools and third-party scheduling platforms will still ask your marketer to log directly into your Instagram account to authenticate it. Have your Instagram login credentials ready to share securely just in case.
BEFORE WE WRAP UP
A few quick things to make sure are in place before your marketer gets started:
~ Your Facebook Page is published and complete with your business name, contact info, and profile photo
~ Your Instagram account is set to Business or Creator (not Personal)
~ Your Instagram and Facebook are linked
~ Your marketer has received and accepted their invite
~ Your Pixel is installed on your website if you plan to run conversion campaigns
WANT US TO JUST DO IT ALL FOR YOU?
If this feels like a lot, that is completely okay. Setting up your Meta Business Suite correctly is one of the first things we do when we onboard a new client. We make sure everything is connected, the pixel is firing, and your account is structured the right way before we ever spend a dollar on ads.